
Fall is always a surreal time for me. There is so much to love about it: the leaves changing, cold nights, sweaters, and hot tea in the mornings. Life seems to slow down. Kids are back at school, and the hectic-ness of summer fizzles out. It is a time of change marking the transition from our summer lives to our winter lives. Autumn is also the culmination of the growing season. In a normal year, it is marked by apple festivals and pumpkin patches. There seems to be something inside of all of us that is enchanted by a bountiful harvest. It’s hard to not get a childlike excitement thinking about an apple orchard in fall. But this bewitching end of the growing season also brings about the realization that for many of us the time of growing our own food, and eating locally, is done for the season. After the last leaves fall, we are back to the supermarkets buying veggies and fruits from half way across the world. However, this doesn’t have to be the way of it. In fact, for most of human history this was not an option. The only option was to make the harvest last through the whole winter, the best way to do this is through canning.

Why can
Canning is a simple and fun way that you can make your harvests extend through the whole winter. There are many benefits that come along with canning you can: save money, increase your self-sufficiency, keep your heritage alive through family recipes, home canned veggies can be more nutritious than store bought canned goods, plus it makes your cabinets Instagram worthy. The list goes on and on. But the biggest reason for canning is that it prevents food from spoiling. Fresh produce spoils for a number of reasons including, micro-organisms (yeasts, bacteria, fungus) that breaking down the food, decomposition enzymes that are present in the plants, oxidization, and moisture loss. Canning prevents all of these.

Clostridium Botulinum
Though canning will prevent all of your hard work growing from going to waist, it is not a fool proof system. There is a bacteria called Clostridium Botulinum that can live through the canning process if it is not done correctly. These bacteria are responsible for the deadly form of food poisoning known as botulism. Clostridium Botulinum can survive the temperatures of boiling water, and live on the surface of all food. However, they need an anaerobic environment, or an environment deprived of oxygen to become active. This is why it is not a concern with fresh food, only canned food. Despite its high threat level Clostridium Botulinum is really easy to prevent.
The bacteria cannot grow in high acid environments, or environments with high levels of sugar. This is why it is important to follow canning recipes that you have, and don’t skimp on the sugar, or change the vinegar (unless you know the two vinegars have a comparable PH level).

Before you get started
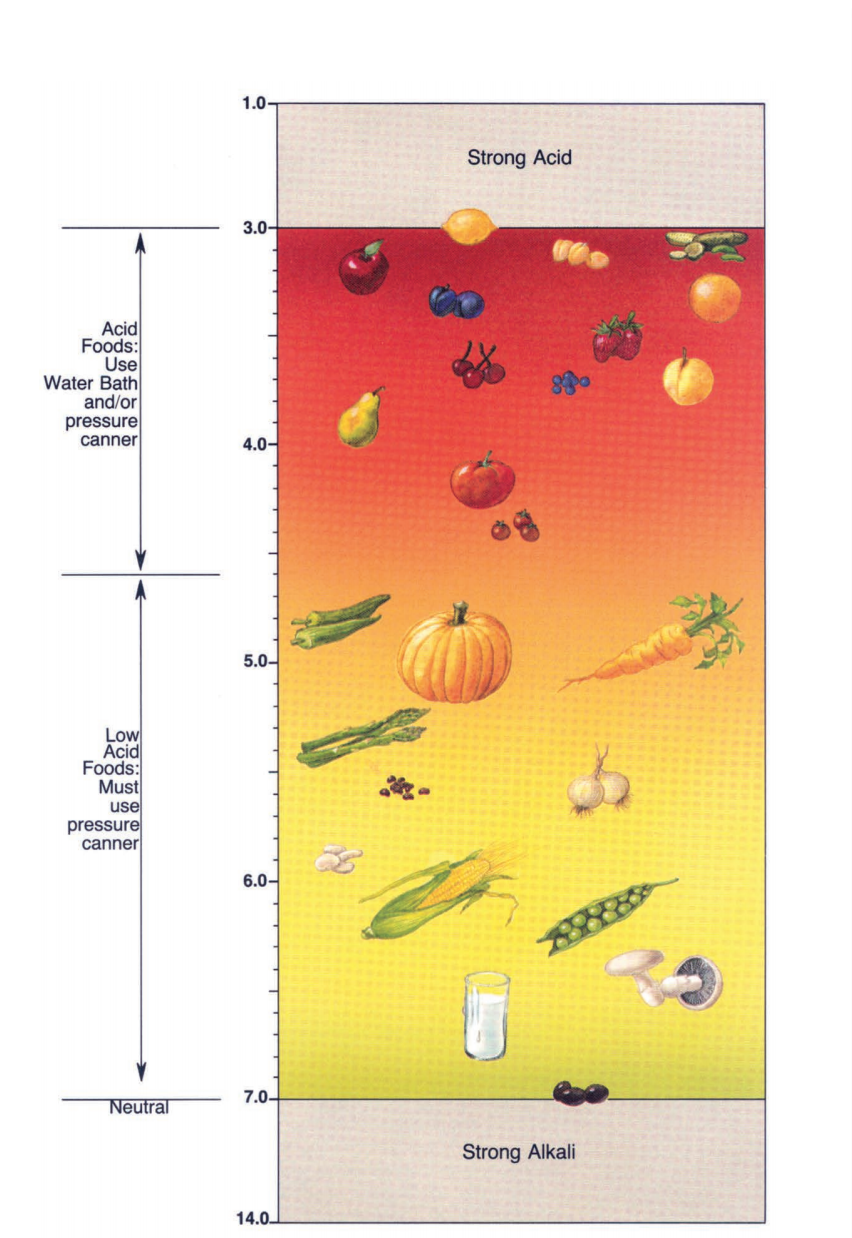
Before you begin actually canning, it is important that you have a recipe that you will follow, understand the steps that will be involved, as well as some basic information about canning. It is important to know the PH of your veggies/fruits, how to sterilize your equipment, if you are hot or cold packing, and how much head space you’ll need.
High PH (low acidity)
Foods with low PH require more attention when canning because they are at higher risk of having Clostridium Botulinum growing in them. Low PH foods include red meats, seafood, poultry, milk, and all fresh vegetables except for most tomatoes. There are two basic approaches to canning foods with a low PH. Use a pressure cooker, or make the food more acidic.
Pressure cookers allow water to boil at a higher temperatures making it so that you can kill the Clostridium Botulinum. Water temperatures need to be between 240˚-250˚ to kill Clostridium Botulinum. If you have a pressure cooker, it is easy to find recipes for canning veggies/fruits in them.
If you do not have a pressure cooker, then you will need to decrease the PH of what you are caning (make it more acidic). Clostridium Botulinum can not grow in an environment with a PH lower than 4.6. Two easy ways to increase the acidity of your veggies/fruits is to either add acidity in the form of vinegar or lemon juice or ferment your veggies/fruits. Simply adding vinegar or lemon juice will be the easiest way to do this. Follow your recipe to see how much acidity you should add. I will be discuses fermenting in another blog (it’s worthy of its own conversation).
Low PH (high acidity)
For foods with Low PH, you do not need to worry about adding acidity to them, but you should still follow the steps of your recipe to ensure that it is safe. Low PH foods include fruits, pickles, sauerkraut, jams, jellies, marmalades, and fruit butters. It is important to note that some tomatoes have a PH that is higher than 4.6. If you are working with sweeter tomatoes, it would be smart to check the PH with a PH tester strip. You can buy them here (they are pretty cheep).
Sterilizing
Once you know the PH of what you are canning and you have decided on a recipe, it is important to make sure what you are working with is sterilized. It is important to clean your veggies/fruits, and equipment, but since bacterial and fungal spores are hard to remove, heat is your best friend. For this, it is important to know how long your jars will be submerged in boiling water. If they will be submerged for more than 10 minutes you do not need to do a pre-sanitizing, because this long of a canning process will sterilize the jars and anything that is in them. If the canning recipe is calling for less than 10 minuets in the water, than the jars will need to be pre-sterilized.
It is important to take altitude into account for your times since water boils at a lower temperature at higher altitudes. Most recipes set their times for water boiling at sea level. This will need to be adjusted for us here in the Gunnison valley. A good rule of thumb is to add 1 minute for every thousand feet above sea level. So for Gunnison you want to add 7 minutes and 40 seconds to any boil times. In Crested Butte, you should add 8 minutes and 50 seconds, or 9 minutes if you’re up on the mountain. If your canning time is less than 10 minutes, you want to make sure and expose your jars and veggies/fruits to a little air as possible. This will help to ensure their cleanliness.

Hot Packing vs Raw (cold) packing
Another distinction to know is whether you are using a hot packing, or a cold packing method. Hot packing is more beneficial in a boiling water canner because it removes more of the air from the veggies/fruits, helping them stay fresh in the cans longer. Raw packing is a better approach for using a pressure canner. Because the high temperatures mitigate all of the side effects of raw packing when using a water boiling canner.
Hot Packing
For hot packing, the veggies/fruits are blanched in the packing liquid to ensure the breakdown of decomposition enzymes and the release of oxygen from the plants that will make them spoil faster. Once blanched, the veggies/fruits and packing liquid are poured into a jar. Make sure that the jar is heated before this to prevent any risk of it cracking from the temperature change. Once it is full, use a thin spatula or spoon to compress the veggies/fruits into the jar, making sure that there is no excess air bubbles in the liquid.
Raw Packing
For raw packing, the veggies/fruits are prepared and then packed tightly into the jar. The packing liquid is then boiled, and poured into the jar. Once it is full, use a spoon or thin spatula to compress the veggies/fruits into the jar, making sure that there is no excess air bubbles in the liquid.

Head space
Head space is the space the is between the lid of the jar, and whatever you are canning. The head space is important because it provides space for the food to expand during the cooking process, as well as helping form the vacuum once the cans are cooling. Your recipe should tell you how much head space to leave in your jars, but here are some general rules of thumb.
1/4-inch for jams and jellies.
1/2-inch for fruits and tomatoes.
1- to 1-1/4-inches in low acid foods to be processed in a pressure canner.
Once you have considered all of these things, found your recipe, and prepared your veggies/fruits, the rest of it is easy. The first thing that you will need to do is gather your materials.
Canning supplies
Large pot for boiling water (make sure that this can hold enough water to have 1 inch of water over your jars).
Jar grabber (trust me, these are nice).
Jar lifter.
Jarring funnel.
Thin spatula (to stir contents poured into the jar).
Canning jars, new lids, rings.
Paper or cloth towel to wipe the jars.

Once your materials are gathered, you’re going to follow these basic canning steps, but please adjust them to whatever your recipe is calling for.
Canning steps

(1) Prep the ingredients.
Wash the veggies. Remove any blemishes or bruises.
Follow your recipe for the contents of your jars.
(2) Sterilize your working areas and materials
Sterilize all surfaces and materials, especially if canning times are less than 10 minutes.
Sterilize the jars in boiling water. If you do not need to sterilize the jars, then warm them up in hot water to help prevent cracking.
Soak the lids in hot water for 10 minutes to soften up the rubber (get new lids every time).
You can leave the rings at room-temperature for easy handling.
(3) Fill the jars.
If utilizing a hot-packing method, blanch your veggies/fruits. If using a raw-packing method, boil your packing liquid.
Use the jarring funnel to fill your jars.
Stir with a spatula to ensure that there are no air pockets.
Leave the appropriate amount of head space that your recipe calls for.
(4) Wipe the rims.
(5) Screw on the lids and bands.
Do not over tighten. You want it to be tight, but not as tight as you can get it. If it is too loose, then it will not make a proper seal, but if it is over tight, then air will not be able to escape, and this will stop the vacuum from forming, and can lead to the jar breaking.
(6) Boil.
Prep your boiling water in a large pot that can cover the top of your jars with at least 1 inch of water.
Fill this pot half way up, and boil water.
Make sure that the water is at least 1 inch over the top of the jars.
Boil for as long as the recipe calls for.
Adjust boiling times for altitude.
Have a second container of boiling water going incase you need to add more water half way through the process.
(6) Remove and cool until you hear the popping sound of the seals forming (they might not pop, but this does not mean that they did not seal).
Do not force cool them. Let the jars cool at room temperature for 12-24 hours.
Check to see that the lid sealed. You will hear the pop (usually).
See if the lid is concave and has a high pitch twang if you tap it with a metal spoon. When you push down on the center of the lid, it should not pop back up.
Store in a cool dry place, no hotter than 95˚, and plan on using within a year.
There are many different ways to canning and preserving food, and even more recipes for it. Yoou should take some time to explore what techniques and recipes are out there. One technique that I will look at is fruit spreads. Spreads such as jams, jellies or butter, are some of the more popular ways to preserve fruits. This is because of how easy they are to do.

Jam’s jellies, and butters.
All fruit spreads are just slight variations of the same thing; fruit, sugar, pectins, and acids. For most fruits, the acids and the pectins are already present in the fruit, so it is really just fruit and sugar. I will break down each of these elements and why they are important.
Sugar
Sugar is extremely important to this process because it acts as the preserving agent. Though most fruits have a low enough PH to ensure that Clostridium Botulinum does not grow, the sugar content also prevents the growth of this bacteria. This is why it is important to not skimp on the sugar measurements of your recipe. It is best to stick to cane sugar, or beet sugar. You can substitute honey or corn syrup, but these might alter the flavor of the spread and can interfere with the jelling process.
Pectins
Pectins are a naturally forming substances in fruits, that when mixed with sugars and acids, form a gel consistency. All fruits contain varying amounts of pectin. Apples, crab apples, gooseberries, some plums and grapes, all contain enough natural pectin to form a gel when mixed with acid and sugar. Other fruits, such as strawberries, cherries, and blueberries, contain little pectin and must be either mixed with other fruits that are high in pectin, or have pectin added to get a gel consistency.
Acid
Acid is needed for two reasons. One, it helps with the preservation of the fruit spread. Secondly, it helps the pectins form a gel consistency. It is important to follow your recipe’s measurements for added acid, because if there is too much or two little, the gel consistency will not set up.

With winter creeping in, our days of local fresh produce are numbered, but this does not mean that the days of us eating off of our gardens are numbered. This quick overview of canning shows how easy you can can the produce you grew in your garden. This will ensure that your garden will keep feeding you through the winter. So get out there, and start canning, and liberate yourself from the industrial food system.
Most of the information in this blog was provided by the National Center for Home Food Preservation. If you are looking for more information or recipes, this website has a plethora of information https://nchfp.uga.edu/publications/publications_usda.html